Quick Answer: How Do You Fix a Phone Microphone?
If your phone microphone is not working, begin by identifying whether the issue is caused by software or hardware. Restart your phone, remove the protective case, clean the microphone opening carefully, test the microphone using the Voice Recorder app, disconnect Bluetooth accessories, update the operating system, and check app permissions. If callers still cannot hear your voice or recordings remain silent, the microphone, charging port assembly, audio IC, flex cable, or motherboard may require professional repair. Most smartphone microphone repairs can be completed the same day by certified technicians using premium-quality replacement parts.
Expert Tip
Never insert needles, pins, paper clips, or other metal objects into your phone’s microphone hole. Modern smartphones use extremely sensitive MEMS microphones that can be permanently damaged by improper cleaning. If debris is blocking the microphone, use compressed air or a soft anti-static brush instead. If the problem persists after safe cleaning, professional diagnosis is the safest option.
Introduction
Your smartphone’s microphone plays a far bigger role than simply allowing people to hear your voice during calls. It is responsible for voice calls, video calls, voice notes, voice assistants, voice recordings, online meetings, social media videos, speech-to-text features, and countless other everyday tasks. When the microphone stops working correctly, even the simplest communication can become frustrating.
A faulty microphone may cause callers to hear nothing at all, hear your voice intermittently, experience distorted or muffled audio, or complain about excessive background noise. In some cases, the problem only affects specific apps such as WhatsApp, FaceTime, Zoom, Microsoft Teams, or Google Meet, while in others the microphone fails across the entire device.
The good news is that not every microphone problem requires replacing the phone or even replacing the microphone itself. Many issues are caused by software settings, blocked microphone ports, Bluetooth conflicts, app permissions, or temporary operating system glitches that can often be resolved within minutes.
The challenge is identifying the real cause before attempting a repair. Replacing the wrong component or attempting an unnecessary DIY repair can increase costs and may even cause further damage to your device.
Whether you own an iPhone, Samsung Galaxy, Google Pixel, Huawei, OnePlus, Oppo, Vivo, Sony Xperia, or another Android smartphone, the troubleshooting methods in this guide apply to almost every modern mobile device.
Why Is Your Phone Microphone Not Working?
Modern smartphones usually contain multiple microphones rather than just one. Depending on the device model, different microphones are used for:
- Phone calls
- Speakerphone calls
- Voice recording
- Video recording
- Noise cancellation
- Voice assistants
- Video conferencing
- Voice typing
This means a problem affecting one microphone may not affect the others. For example, your voice may sound perfectly clear during video recordings but disappear during normal phone calls, indicating that only one microphone has developed a fault.
Microphone problems can appear gradually or suddenly. Some develop after months of dust accumulation, while others occur immediately after dropping the phone, exposing it to water, or installing a software update. Some of the most common causes include:
- Dust or lint blocking the microphone opening
- Water or liquid damage
- Physical impact after dropping the phone
- Faulty charging port assembly
- Damaged microphone flex cable
- Software bugs
- Corrupted operating system updates
- Incorrect microphone permissions
- Bluetooth audio conflicts
- Worn internal components
- Motherboard or Audio IC faults
- Third-party accessories interfering with audio
Fortunately, many microphone issues are easier to fix than people expect. Our technicians regularly diagnose devices that appear to have failed microphones but actually only require software adjustments or careful cleaning.
Before You Attempt Any Microphone Repair
One of the biggest mistakes smartphone users make is immediately assuming the microphone has failed. Professional technicians always begin with a structured inspection before replacing any components. Before troubleshooting your phone, follow these essential preparation steps.
1. Back Up Your Important Data
If your smartphone still powers on normally, create a backup before performing advanced troubleshooting. Protect important information including:
- Photos
- Videos
- Contacts
- Messages
- Notes
- Documents
- App data
- Passwords
Although microphone troubleshooting is generally safe, any advanced software recovery procedure carries a small risk of data loss.
2. Remove Cases and Accessories
Many protective accessories partially cover microphone openings without users noticing. Before testing the microphone, remove:
- Thick protective cases
- Waterproof cases
- Phone skins
- External microphones
- USB accessories
- Headphones
- Bluetooth devices
Even premium phone cases can occasionally interfere with microphone performance if they aren’t designed specifically for your phone model.
3. Inspect the Microphone Openings
Modern smartphones often have two or three microphone holes. Carefully inspect each one under bright lighting. Look for:
- Pocket lint
- Dust
- Dirt
- Dried liquid residue
- Makeup or cosmetic residue
- Food particles
- Damage around the microphone grille
- Bent frame after a drop
Many “broken” microphones simply have blocked microphone ports.
4. Determine Whether the Problem Is Software or Hardware
This is one of the most important steps during professional smartphone diagnostics.
| Software Problems | Hardware Problems |
|---|---|
| App permissions | Water damage |
| Operating system bugs | Broken microphone |
| Bluetooth conflicts | Charging port assembly damage |
| Voice recorder errors | Flex cable failure |
| App crashes | Motherboard faults |
| Settings misconfiguration | Physical impact damage |
Correctly identifying the cause prevents unnecessary repairs and saves both time and money.
From Our Repair Bench
At iExpert Repairs, we diagnose microphone faults on smartphones every day. Surprisingly, a significant number of devices booked in for “microphone replacement” don’t actually need a new microphone. In many cases, the issue is caused by compacted pocket lint blocking the microphone port, incorrect app permissions, Bluetooth devices accidentally taking over audio input, or software glitches following an operating system update.
That’s why our technicians always carry out a full diagnostic before replacing any parts. This approach helps customers avoid unnecessary repair costs while ensuring the real fault is identified first.
Why Is My Phone Microphone Not Working?
A faulty microphone can make your smartphone almost impossible to use. You may be unable to make phone calls, send voice notes, use voice assistants like Siri or Google Assistant, join video meetings, or record clear videos. Fortunately, a microphone problem doesn’t always mean the hardware has failed. In many cases, the issue is caused by software settings, blocked microphone holes, moisture, Bluetooth conflicts, or app permissions.
Our technicians at iExpert Repairs have repaired thousands of microphone-related issues across iPhones, Samsung Galaxy devices, Google Pixel phones, Huawei smartphones, OnePlus devices, and many other Android models throughout the UK. Based on that real-world experience, we’ve created this complete troubleshooting guide to help you identify the cause and determine whether a simple fix or a professional repair is required.
Common Signs of a Faulty Phone Microphone
Different microphone faults produce different symptoms. Recognising the signs helps narrow down the cause more quickly. You may notice:
- People cannot hear you during phone calls.
- Voice notes record no sound.
- Your voice sounds muffled or distorted.
- Siri or Google Assistant cannot hear commands.
- Video recordings have no audio.
- Speakerphone works but normal calls do not.
- Only certain apps cannot detect your voice.
- Audio cuts in and out randomly.
- Calls constantly switch between clear and silent audio.
- Microphone stops working after a phone drop or water exposure.
Some symptoms point towards software issues, while others indicate physical damage to one of the phone’s internal microphones. Most modern smartphones don’t have just one microphone. Premium devices usually contain two to four microphones, each serving a different purpose.
| Microphone | Function |
|---|---|
| Primary microphone | Voice calls |
| Secondary microphone | Noise cancellation |
| Top microphone | Video recording |
| Rear microphone | Camera audio recording |
This explains why:
- Phone calls may fail while videos still record sound.
- Voice Recorder works but WhatsApp doesn’t.
- Speakerphone works while normal calls don’t.
- Video recordings sound perfect but calls remain silent.
Professional technicians always identify which microphone has failed before recommending repairs.
Step 1: Restart Your Phone
A temporary software glitch is one of the easiest causes to eliminate. Restarting refreshes:
- Audio drivers
- Background services
- Phone app
- Voice processing
- System cache
Many temporary microphone problems disappear after a simple restart. Although basic, this remains one of the first diagnostic steps our technicians perform.
Step 2: Test the Microphone Properly
Don’t rely only on phone calls. Instead, test multiple audio functions. Try:
- Voice Recorder
- WhatsApp Voice Notes
- Camera Video Recording
- Google Assistant
- Siri
- Zoom
- Microsoft Teams
- Voice Search
If Voice Recorder works but phone calls don’t, the issue is likely software-related rather than a damaged microphone. Testing multiple apps provides valuable clues before replacing any hardware.
Step 3: Check Microphone Permissions
Privacy settings may prevent apps from accessing your microphone. Review permissions for apps such as:
- Zoom
- Teams
- Messenger
- Skype
- Google Meet
- Camera
On Android:
Settings → Privacy → Microphone Permission
On iPhone:
Settings → Privacy & Security → Microphone
If permission is disabled, the app cannot record your voice even if the microphone is fully functional.
Step 4: Clean the Microphone Openings
One of the most overlooked causes of poor microphone quality is dirt. Microphone holes easily collect:
- Pocket lint
- Dust
- Makeup
- Skin oils
- Dirt
- Fabric fibres
These tiny openings are extremely sensitive. Clean carefully using:
- Soft anti-static brush
- Microfibre cloth
- Compressed air
Never use:
- Pins
- Needles
- Toothpicks
- Safety pins
- Metal wire
These objects can permanently damage the microphone membrane. If your phone has also started producing distorted audio or you cannot hear callers properly, the problem may involve both the microphone and speaker system. In that case, read our How to Fix Phone Speaker Issues for a complete diagnosis.
Step 5: Disconnect Bluetooth Devices
Many users forget their phone remains connected to:
- Wireless earbuds
- Bluetooth headphones
- Smart watches
- Car audio systems
- Portable speakers
If Bluetooth audio is active, your phone may be using another microphone instead of the built-in one. Try:
- Disable Bluetooth.
- Disconnect all paired devices.
- Test your microphone again.
This simple step resolves many “microphone not working” complaints.
Step 6: Remove the Phone Case
Some rugged phone cases partially cover the microphone openings. This can cause:
- Muffled audio
- Quiet recordings
- Distorted voice
- Poor call quality
Remove the case temporarily and repeat the microphone tests.
Step 7: Install the Latest Software Updates
Operating system updates frequently include fixes for:
- Audio drivers
- Call quality
- Voice processing
- App compatibility
- Security improvements
Check for updates.
iPhone
Settings → General → Software Update
Android
Settings → Software Update
Install official manufacturer updates only.
Step 8: Boot Into Safe Mode (Android)
Third-party applications occasionally interfere with microphone functionality. Safe Mode loads only essential system apps. If the microphone works normally in Safe Mode:
- A recently installed app is likely responsible.
- Remove suspicious apps.
- Restart normally.
- Test again.
Safe Mode is particularly useful after installing recording apps or call-recording software.
Step 9: Reset App Preferences or Network Settings
Corrupted settings may affect voice communication. Depending on your device, consider:
- Reset Network Settings
- Reset App Preferences
- Reset All Settings
These options restore system configurations without immediately erasing personal files. A full factory reset should only be considered after backing up your important data and exhausting less invasive troubleshooting steps.
How to Fix a Phone Microphone After Water Damage?
Water damage is one of the most serious causes of microphone failure. Even a small amount of moisture can affect the delicate microphone membranes, audio circuits, and connectors inside your smartphone. While some devices have water-resistant ratings, no phone is completely waterproof, and prolonged exposure to liquids can still cause internal damage.
If your microphone stopped working after dropping your phone in water, spilling a drink on it, or getting caught in heavy rain, acting quickly can significantly improve the chances of a successful repair.
1. Turn Off Your Phone Immediately
If your phone is still switched on after water exposure, power it off as soon as possible. Continuing to use a wet phone can cause short circuits that damage the motherboard, charging IC, microphones, speakers, cameras, and display components. Remove the following if possible:
- SIM card
- Memory card
- Protective case
- External accessories
Leave the device switched off until it has been properly inspected or dried.
2. Dry the Outside Carefully
Use a clean, lint-free microfibre cloth to gently dry the exterior of the device. Pay particular attention to:
- Bottom microphone holes
- Charging port
- Speaker grilles
- SIM tray
- Camera openings
Avoid shaking the phone, as this may push water deeper into the internal components.
3. Avoid Common DIY Mistakes
Many online “solutions” can actually make water damage worse.
Never:
- Use a hairdryer.
- Place the phone in an oven.
- Leave it on a radiator.
- Put it in direct sunlight for long periods.
- Insert cotton buds or sharp objects into the microphone.
- Charge the phone immediately.
- Blow into the microphone holes.
One of the biggest myths is putting a wet phone in rice. For a complete step-by-step recovery process, read our Water Damaged Phone Repair guide, where our technicians explain what actually works and what should always be avoided.
4. Test the Microphone After Drying
Once the phone has dried naturally, test every microphone individually.
Check:
- Phone calls
- Speakerphone calls
- Voice Recorder
- Camera video recording
- WhatsApp voice notes
- Siri or Google Assistant
Sometimes only one microphone fails while the others continue working normally. Testing each function separately helps identify which microphone may be damaged.
5. Watch for Signs of Internal Corrosion
Even if the microphone starts working again, corrosion may continue developing inside the phone over the following days or weeks. Warning signs include:
- Crackling audio
- Muffled recordings
- Random microphone failure
- Speaker distortion
- Charging problems
- Camera issues
- Unexpected shutdowns
Corrosion spreads gradually, which is why early professional cleaning often prevents much more expensive repairs later.
How to Fix a Phone Microphone After a Drop?
Dropping your smartphone can damage much more than the display. The impact may loosen internal connectors, damage the microphone module, or even affect the motherboard. If your microphone stopped working immediately after your phone was dropped, the problem is likely hardware-related.
1. Inspect the Device Carefully
Look for signs such as:
- Cracked screen
- Bent frame
- Loose back glass
- Damaged charging port
- Cracked camera lens
- Visible dents around the microphone area
Physical damage around the bottom edge of the phone often indicates impact near the primary microphone.
2. Test Different Recording Modes
Record audio using:
- Front camera
- Rear camera
- Voice Recorder
- Phone calls
- Speakerphone
If only one function fails, technicians can identify which microphone requires replacement without replacing unnecessary components.
3. Check for Loose Internal Connections
Inside modern smartphones, microphones connect to the motherboard using delicate flex cables. A heavy drop may cause:
- Loose connectors
- Torn flex cables
- Damaged microphone modules
- Cracked solder joints
- Motherboard faults
These issues require professional inspection because opening modern smartphones without specialist tools can damage waterproof seals, display cables, and Face ID or fingerprint components.
Signs Your Phone Needs Professional Microphone Repair
While many software-related microphone issues can be resolved at home, certain symptoms almost always require professional attention. Arrange a diagnostic if:
- Nobody can hear you during calls.
- Voice recordings contain no sound.
- Audio cuts in and out constantly.
- The microphone stopped working after water damage.
- The problem began immediately after dropping the phone.
- Cleaning the microphone made no difference.
- Software updates have not resolved the issue.
- Voice Assistant cannot detect your speech.
- Multiple microphones have stopped working.
- Other hardware problems have appeared alongside the microphone fault.
At iExpert Repairs, every device undergoes a comprehensive diagnostic before any repair is recommended. Our technicians identify the exact cause of the fault, ensuring only the necessary components are repaired or replaced. This approach helps avoid unnecessary costs while restoring your smartphone to full working order.
How Professional Technicians Diagnose Phone Microphone Problems
One of the biggest mistakes people make is assuming the microphone itself has failed. In reality, a microphone issue can originate from several different components, including the charging port assembly, audio IC, flex cables, motherboard, software, or even a blocked microphone mesh.
At iExpert Repairs, our certified technicians follow a structured diagnostic process before recommending any repair. This ensures that only the faulty component is repaired, saving customers unnecessary costs while restoring the device to full working order.
Step 1: Visual Inspection
Every repair begins with a careful external inspection. Technicians check for:
- Impact damage
- Bent frames
- Cracked housings
- Water indicators
- Corrosion
- Damaged microphone mesh
- Loose charging ports
- Previous repair work
Many microphone issues become obvious before the device is even opened.
Step 2: Software Diagnostics
Professional diagnostic software helps determine whether the microphone hardware is communicating correctly with the operating system. Technicians inspect:
- Audio drivers
- Microphone permissions
- System logs
- Error reports
- Firmware version
- App conflicts
- Operating system integrity
Many intermittent microphone faults are resolved through software optimisation rather than hardware replacement.
Step 3: Audio Function Testing
Rather than relying on a single voice recording, technicians test every microphone individually. Typical tests include:
- Standard phone calls
- Speakerphone calls
- Voice Recorder
- Video recording
- Noise cancellation
- Voice Assistant
- Third-party communication apps
Testing multiple audio functions helps identify exactly which microphone has failed.
Step 4: Internal Hardware Inspection
If software checks don’t identify the fault, the phone is carefully disassembled using specialist tools. Technicians inspect:
- Microphone flex cables
- Charging port assembly
- Audio IC connections
- Internal connectors
- Moisture indicators
- Corrosion
- Motherboard damage
Because modern smartphones are tightly sealed with adhesive and waterproof gaskets, opening them without proper equipment can cause additional damage. This is why hardware inspections should always be carried out by experienced repair professionals.
Common Causes of Phone Microphone Failure
After repairing thousands of smartphones across the UK, we’ve found that most microphone problems fall into a small number of categories.
| Cause | Typical Symptoms | Recommended Solution |
|---|---|---|
| Dust or debris | Muffled voice | Professional cleaning |
| Software bug | Microphone works intermittently | Software update or reset |
| Water damage | Distorted or no audio | Internal cleaning and diagnostics |
| Physical impact | Microphone stopped after a drop | Hardware inspection |
| Charging port assembly failure | Calls have no audio | Charging port replacement |
| Audio IC fault | Multiple microphones fail | Motherboard repair |
| Flex cable damage | Random microphone failure | Flex cable replacement |
| Manufacturing wear | Weak audio on older phones | Component replacement |
Understanding the underlying cause prevents unnecessary repairs and helps restore reliable audio performance.
DIY Repair vs Professional Microphone Repair
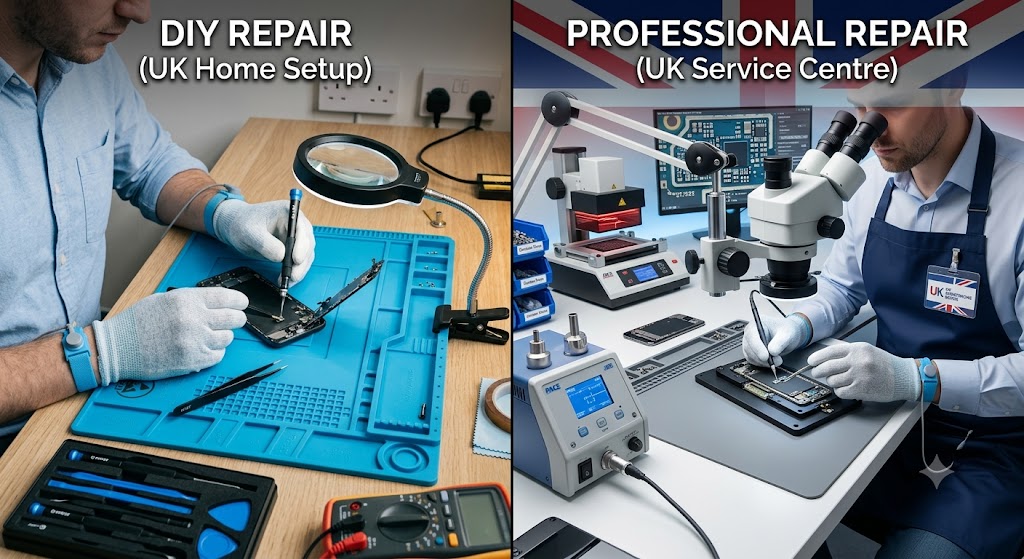
Although basic troubleshooting is safe for most users, replacing a smartphone microphone is a complex repair that requires specialist tools and experience.
| Task | DIY Suitable | Technician Required |
|---|---|---|
| Restart the phone | Suitable | Required |
| Update the software | Suitable | – |
| Clean the microphone openings | Suitable | – |
| Check microphone permissions | Suitable | – |
| Test the microphone using the Voice Recorder app | Suitable | – |
| Disconnect Bluetooth devices | Suitable | – |
| Replace the microphone module | – | Required |
| Replace the charging port with microphone assembly | – | Required |
| Repair the Audio IC | – | Required |
| Repair motherboard faults | – | Required |
| Clean and repair water-damaged components | – | Required |
Attempting advanced repairs without the correct tools may damage waterproof seals, display assemblies, Face ID components, fingerprint sensors, or the motherboard, significantly increasing repair costs.
Why Choose iExpert Repairs for Phone Microphone Repairs?
When your microphone stops working, you need more than just a replacement part – you need an accurate diagnosis from experienced professionals.
At iExpert Repairs, we’ve been repairing smartphones for over 10 years, helping customers across the UK restore clear call quality, reliable voice recording, and full microphone functionality. We repair microphone faults on:
- Apple iPhones
- Samsung Galaxy smartphones
- Google Pixel phones
- Huawei smartphones
- OnePlus devices
- Oppo smartphones
- Sony Xperia phones
- Xiaomi devices
- Motorola phones
- Many other Android models
Whether the issue is caused by liquid damage, accidental drops, worn charging port assemblies, or motherboard faults, our certified technicians use premium-quality replacement parts and manufacturer-approved repair procedures to ensure long-lasting results.
Why Customers Trust iExpert Repairs
- Over 10 years of smartphone repair experience.
- Certified repair technicians.
- Professional diagnostic service before every repair.
- Premium-quality replacement components.
- Same-day repairs on most devices.
- UK-wide secure mail-in repair service.
- Free tracked return delivery.
- 12-month warranty on most repairs.
If your phone has additional issues such as a cracked display, charging fault, battery problem, speaker failure, or camera malfunction.
How to Prevent Phone Microphone Problems?
While not every microphone fault can be avoided, good maintenance habits can significantly reduce the risk of expensive repairs. At iExpert Repairs, we’ve found that many microphone issues are caused by everyday wear, accidental damage, or poor charging and cleaning practices rather than manufacturing defects.
Following these simple tips can help keep your phone’s microphones working properly for years.
1. Keep the Microphone Openings Clean
Your smartphone’s microphone holes are exposed to dust, pocket lint, and other debris every day. Over time, this buildup can muffle your voice or reduce recording quality.
To keep them clean:
- Wipe your phone regularly with a soft microfibre cloth.
- Use a soft anti-static brush to remove dust.
- Store your phone in a clean pocket or bag.
- Avoid placing the phone on dirty surfaces.
Never insert needles, pins, or other sharp objects into the microphone openings, as this can permanently damage the sensitive microphone membrane.
2. Protect Your Phone from Drops
Accidental drops remain one of the leading causes of microphone failure. Even if the screen doesn’t crack, the impact can damage internal microphone components, flex cables, or the motherboard. Reduce the risk by:
- Using a high-quality protective case.
- Installing a tempered glass screen protector.
- Avoiding carrying your phone loosely with keys or coins.
- Keeping a secure grip when using your phone outdoors.
If your phone has recently been dropped and you’re experiencing multiple problems such as display damage or touch issues alongside microphone failure, our Phone Touch Screen Not Responding? explains how impact damage can affect several components at once.
3. Avoid Water and Excess Moisture
Although many modern smartphones offer some level of water resistance, no device is completely immune to liquid damage.
To reduce the risk:
- Keep your phone away from swimming pools and sinks.
- Avoid using it in heavy rain whenever possible.
- Never charge a wet phone.
- Dry the device immediately if it becomes damp.
If liquid has already entered your phone, follow the advice in our Water Damaged Phone Repair guide before attempting to use or charge the device again.
4. Use High-Quality Accessories
Poor-quality accessories can sometimes contribute to hardware problems over time. Whenever possible, use:
- Manufacturer-approved chargers.
- Certified USB cables.
- Reliable power adapters.
- Quality protective cases.
Cheap accessories may cause charging instability, electrical fluctuations, or overheating that can affect other internal components.
5. Keep Your Software Updated
Manufacturers regularly release software updates that improve:
- Audio processing
- Call quality
- Security
- System stability
- App compatibility
- Performance
Installing official updates helps prevent software bugs that may interfere with microphone functionality. Avoid downloading unofficial firmware or software from untrusted sources, as these can introduce compatibility issues and compromise device security.
When Should You Replace Your Phone Instead of Repairing It?
Not every microphone fault means it’s time to buy a new smartphone. In many cases, repairing the device is far more affordable than replacing it, particularly if the problem is limited to the microphone or another single component. Repairing your phone is usually the best option when:
- Only the microphone has failed.
- The device is otherwise in good condition.
- The repair cost is significantly lower than buying a replacement.
- The phone still receives software updates.
- You want to keep your existing data and apps.
However, replacing the device may be the more practical choice if:
- The motherboard has severe liquid damage.
- Multiple expensive components have failed.
- Repair costs approach the value of the phone.
- The device is very old and no longer supported by the manufacturer.
Frequently Asked Questions
1. Why can’t people hear me during phone calls?
This is commonly caused by a blocked microphone, incorrect microphone permissions, software issues, water damage, or a faulty microphone module. Testing the microphone with Voice Recorder can help determine whether the problem is hardware or software related.
2. Can a phone microphone be repaired?
Yes. In many cases, a faulty smartphone microphone can be repaired or replaced without replacing the entire phone. Professional technicians first perform diagnostics to identify the exact cause before recommending any repair.
3. How much does microphone repair cost in the UK?
The cost depends on your phone model and the underlying fault. A simple microphone replacement is generally less expensive than repairing motherboard-related audio issues. A professional diagnostic provides the most accurate quotation.
4. Can dust stop my microphone from working?
Yes. Dust, lint, and debris can block the microphone openings, making your voice sound muffled or preventing clear audio recording. Careful cleaning often restores normal performance if no hardware damage is present.
5. Why does my microphone work on speakerphone but not during normal calls?
Modern smartphones contain multiple microphones. If only one microphone has failed, some functions may continue working while others do not. Professional testing can identify which microphone requires repair.
6. Can water permanently damage a phone microphone?
Yes. If moisture reaches the internal microphone components, corrosion may develop and cause permanent damage. Switching the phone off immediately and arranging professional cleaning offers the best chance of successful recovery.
7. Is it safe to replace a phone microphone yourself?
Modern smartphones are highly compact and sealed. Replacing a microphone requires specialist tools and experience, making professional repair the safest option for most users.
8. How long does microphone repair usually take?
Most standalone microphone repairs can often be completed on the same day, depending on the device model and the availability of replacement parts. More complex repairs involving liquid damage or motherboard faults may take longer.
9. Why is my phone microphone so quiet during calls?
A quiet microphone is often caused by dust blocking the microphone opening, a damaged microphone mesh, incorrect noise cancellation settings, a phone case covering the microphone, or internal hardware damage. Start by cleaning the microphone carefully, removing the phone case, and testing the microphone using Voice Recorder. If callers still struggle to hear you, professional diagnostics may be needed.
10. Can software updates fix phone microphone problems?
Yes. Software updates often include bug fixes for audio processing, microphone performance, call quality, and app compatibility. Before considering a hardware repair, install the latest official software update for your iPhone or Android device and test the microphone again.
11. Why does my phone microphone stop working after getting wet?
Water can damage the microphone membrane, connectors, or internal audio circuits. Even if the phone appears to work normally, corrosion may develop over time and cause poor audio quality or complete microphone failure. Turn the device off immediately, avoid charging it, and have it professionally inspected as soon as possible.
12. How Long Does a Phone Microphone Repair Usually Take?
Most standalone microphone repairs can often be completed on the same day, depending on your phone model and the availability of replacement parts. More complex repairs involving water damage or motherboard faults may require additional diagnostic time. At iExpert Repairs, most common smartphone repairs are completed quickly and backed by a 12-month warranty.
Final Thoughts
A clear and reliable microphone is essential for calls, voice notes, video meetings, voice assistants, and emergency communication. When your phone microphone stops working, the cause isn’t always obvious. In some cases, a simple settings change or software update is enough to restore normal performance, while in others, the problem may be linked to internal hardware that requires specialist attention.
The safest approach is to work through each troubleshooting step methodically rather than jumping straight to repairs or replacing your device. Identifying the real cause can save time, reduce unnecessary costs, and prevent accidental damage from incorrect DIY fixes.
If the issue persists after completing the checks in this guide, a professional diagnostic is the most reliable way to confirm whether the fault lies with the microphone itself or another internal component. An accurate diagnosis ensures the correct repair is carried out the first time, helping restore clear audio and reliable performance without replacing parts that don’t need changing.
For more smartphone troubleshooting advice, explore our complete repair guides covering charging problems, speaker faults, water damage, touchscreen issues, and overall smartphone diagnostics. If you need expert assistance, you can also book a repair with iExpert Repairs, where our experienced team provides trusted smartphone repair services for customers across the UK.
How Much Does Phone Microphone Repair Cost in the UK?
The cost of repairing a phone microphone in the UK depends on your smartphone model, the type of fault, and whether the issue is caused by a blocked microphone, liquid damage, a damaged charging port assembly, or a motherboard-related audio IC fault. Minor issues such as microphone cleaning are generally inexpensive, while board-level repairs require advanced diagnostics and specialist equipment.
Below are the typical price ranges for common microphone repairs across the UK.
| Repair Type | Typical UK Cost (2026) |
|---|---|
| Microphone Cleaning | £15-£30 |
| Charging Port with Microphone Assembly | £40-£90 |
| iPhone Microphone Repair | £45-£120 |
| Samsung Microphone Repair | £40-£110 |
| Audio IC / Motherboard Repair | £90-£220 |
The final repair cost depends on your device model, the extent of the damage, and whether additional components require replacement. At iExpert Repairs, every device undergoes a professional diagnostic assessment before any repair is carried out, ensuring you receive an accurate quotation with no unnecessary work. Most microphone repairs can be completed on the same day using premium-quality replacement parts and are backed by our 12-month warranty.
Typical Phone Microphone Repair Times
The repair time for a faulty phone microphone varies depending on the type of fault and whether additional components require replacement. Most common microphone repairs can be completed on the same day, while more complex motherboard repairs may take longer because they require detailed diagnostics and precision board-level work.
| Repair Type | Typical Repair Time |
|---|---|
| Microphone Cleaning | 20-30 Minutes |
| Microphone Replacement | 45-90 Minutes |
| Charging Port with Microphone Assembly | 1-2 Hours |
| Water Damage Diagnostics | Same Day |
| Audio IC / Motherboard Repair | 1-3 Working Days |
Repair times may vary depending on the device model, parts availability, and the severity of the fault. At iExpert Repairs, our certified technicians carry out a full diagnostic assessment before beginning any repair, helping ensure accurate turnaround times and high-quality results.
Back to posts